
Pimmich Documentation
Learn how to configure and use every feature of your photo frame.
🎞️ “Display” Tab
This section allows you to configure the slideshow display on the Pimmich connected frame. Each setting affects the visual rendering, display duration, and screen behavior.
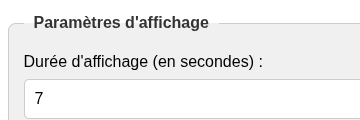
⏱️ Display Duration
Display duration (in seconds): The time each photo is visible before moving to the next one.
Example: 7 = each photo is displayed for 7 seconds.
🌅 Activity Period
Start time and end time define the time range during which the frame is active.
Outside this range, the screen automatically goes into standby (under Wayland, via wlr-randr).
- Start:
06:45 - End:
23:30

📐 Display Dimensions
These settings allow you to define the size of the space used for displaying photos on the screen:
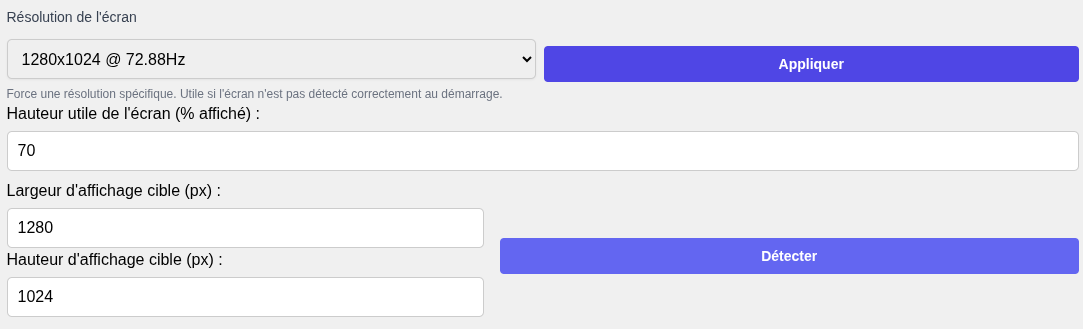
- Screen resolution: Allows changing the display resolution.
- Usable screen height: percentage of the screen used (e.g.,
100%= full height). - Target width (px): maximum width for resizing images (
1920recommended for Full HD). - Target height (px): maximum height for images (
1080for Full HD).
🔍 Auto-Detection
“Detect” button: tries to automatically detect the resolution of the connected screen (useful if hardware changes).
🎥 Visual Effects
📸 Pan / Zoom Effect
Enables a smooth motion effect on photos, also known as the Ken Burns effect.
- Zoom amplitude: value > 1 to slightly zoom in on the image (e.g.,
1.15= 15% zoom).

✨ Transition between photos
Adds a smooth transition between slideshow images.
- Transition duration: in seconds (e.g.,
0.5). - Transition type: selection of the style (fade, slide, etc. – depends on the graphics engine used).

✍️ Custom Text Overlay
Displays a custom message overlaid on the slideshow. Useful for a welcome message or information.
- Text to display: The message you want to appear.
- Font, size, color, and position options are similar to those for the time display.
🔌 Smart Plug Control
Pimmich can control most smart plugs that are manageable via simple web (HTTP) requests. When you enable this option, Pimmich will send commands to specific web addresses (URLs) to turn your plug on or off.
- Power On: At the beginning of the active time range, Pimmich sends the power-on command to the plug. To ensure the screen initializes correctly with the right resolution, the system then performs a full reboot. This is normal behavior that guarantees display stability.
- Power Off: At the end of the time range, Pimmich first puts the screen into software standby, then sends the power-off command to the plug to cut the power.
Configuration
To configure this feature, go to the Display tab.
- Enable smart plug control by checking the corresponding box.
- Fill in the URLs to turn your plug on and off. Most smart plug firmwares (Tasmota, Shelly, Kasa via a gateway) or home automation systems like Home Assistant support this type of control.
- URL Examples:
Tasmota: http://PLUG_IP/cm?cmnd=Power%20On Shelly: http://PLUG_IP/relay/0?turn=on Home Assistant (Webhook): http://HA_IP:8123/api/webhook/WEBHOOK_ID - Delay after power on: This is the time (in seconds) Pimmich waits after turning on the plug before rebooting. This delay allows the screen to initialize. If you notice that the screen resolution is incorrect after a reboot, try increasing this value (e.g., to 10 or 15 seconds).
- (Optional) Status URL: If your system supports it (like Home Assistant), you can provide a URL that returns the plug's state (on/off). This will display a visual indicator in the Pimmich interface.
Once configured, this feature will make your photo frame's power management fully automatic and efficient.
- For better performance, avoid using complex effects on older Raspberry Pi models.
- Transitions and pan/zoom are disabled if the display duration is too short.
🕒 “Time, Weather & Tides” Tab
This section allows you to enable and customize the display of the time, date, current weather conditions, and tides directly on the Pimmich slideshow.
🕰️ Time Display
- Show time: enables the clock display on the frame.
- Font size: for example,
23pixels. - Horizontal / vertical offset: allows for precise positioning of the time on the screen.
- Text color: hexadecimal code, e.g.,
#ffffff(white). - Outline color: e.g.,
#000000(black) to improve readability. - Time position: e.g.,
Left, can also be Centered or Right depending on the theme. - Font: e.g.,
DejaVu Sans Bold. Font installed on the system. - Show background: enables a semi-transparent rectangle behind the info (time, weather…).
- Background color: RGBA code like
#00000080for black at 50% opacity.
📅 Date Display
- Show date: displays the date just below the time.
- Date format: uses
strftimesyntax. For example,%d/%m/%Y→ 08/07/2025.
🌤️ Weather Display (OpenWeatherMap)
- Show weather: enables the display of current weather conditions.
- City: Use the name of the city.
- API Key: personal key obtained from OpenWeatherMap.
- Test key and city: button that checks if the entered information is valid.
- Units: usually
Celsius. - Update interval: in minutes. Example
60= update every hour.
The display also includes forecasts for the next 3 days.
🌊 Tide Display (StormGlass)
Displays the times and heights of the next high and low tides. Ideal for frames installed by the sea.
- Show tide information: enables the tide display.
- Latitude / Longitude: GPS coordinates of the desired port.
- StormGlass API Key: provided on stormglass.io.
- Horizontal / vertical offset: adjusts the position of the tide data on the screen.
- Test connection: checks that the StormGlass API responds correctly with the provided coordinates.
- Force update: immediately reloads the latest tide data.
The display includes forecasts for the next 3 days.
Example of displayed status:
Last update: 08/07/2025 at 19:39:27
Next High Tide: 07:03 (2.9m)
Next Low Tide: 01:24 (-2.8m)
API Status: OK
🖼️ “Photo Sources” Tab
📡 Import from Immich
Connect your frame to an Immich server to automatically retrieve photos from a defined album.
- Immich album name: exact identifier of the album.
- Server URL: full access address to Immich.
- Access token: API token allowing authentication without classic credentials.
Automatic Update
- Enable automatic update: regularly checks for and downloads new photos from the album.
- Interval: update frequency in hours (e.g.,
6). - Service status: indicates if the process is active, pending, or in error.
🖥️ Samba Share Configuration (Windows network)
Allows synchronizing photos stored on a shared folder on the local network via the SMB (Samba) protocol.
- Server: IP address of the machine sharing the photos.
- Share name: name of the shared folder visible in Windows.
- Path in share (optional): specific subfolder to import (e.g.,
/). - Credentials (optional): username and password if access is protected.
Automatic Update (Samba)
- Enable automatic update: regularly retrieves new photos from the shared folder.
- Interval: synchronization frequency (e.g., every 6 hours).
- Test connection: checks that the Samba server is reachable and that the credentials are correct.
📦 Other Photo Sources
You can combine several photo sources in the slideshow:
- Immich Photos
- USB Photos
- Samba Photos
- Smartphone Photos
Photos from different sources are randomly mixed during the slideshow.
⚙️ Startup Option
Skip first automatic import: allows not to immediately run Immich and Samba synchronizations after a frame restart. Useful if you want to give the network time to connect or avoid excessive CPU load at boot.
🖼️ “Preview” Tab
📚 Organized by Source
The Preview tab displays photos grouped by their origin:
- 📡 Immich Photos
- 💾 USB Photos
- 📂 Samba Photos
- 📱 Smartphone Photos
Each group is clearly identified to make photo management easier.
🧹 Bulk Deletion
A “Delete All” button is available for each source. It allows you to delete all photos from Immich, USB, Samba, etc. at once.
🖼️ Thumbnails with Actions
Photos are displayed as thumbnail previews. For each photo, you can:
- 🗑️ Delete the photo individually
- 🎨 Apply a filter:
Black & WhiteSepiaVignetteVintagePolaroid
- ↩️ Revert to the original version (no filter)
prepared/ folder without altering the original image in photos/.
🔍 Zoom and Navigation
Clicking on a thumbnail opens the photo in full size. A viewer is activated:
- You can scroll through the photos using the arrow keys (← and →)
- You can close the viewer using the Escape key
⚙️ “Actions” Tab
🖥️ Live Preview
Displays in real time the photo currently shown on the frame.
Useful to quickly check if the slideshow is running or which image is being displayed.
🎬 Slideshow Management
Control the slideshow directly from the web interface using the virtual remote:
- Previous / Next Photo: To manually navigate between images.
- Pause / Resume: To freeze or resume automatic scrolling.
- Stop Slideshow: Completely stops the display.
📥 Import Photos
You can import new photos from several sources:
- 🔌 From a USB stick plugged into the Raspberry Pi
- 🌐 From Immich (via API and token)
- 🖧 From Samba (network share)
Each action starts an automatic import process with file preparation (resizing, orientation, blurred background if needed).
📲 Import from Smartphone
Allows you to send photos directly from a phone via the mobile browser:
- Tap the
Select filebutton - Select one or more images from your phone
- Click
Send Photos
🧾 “Validation” Tab
📸 Photos Awaiting Validation
This section displays photos that were sent from a smartphone without being identified (guest mode) (via the Actions tab), but haven't been approved yet.
For each pending photo:
- 📥 You can approve the photo – it will be added to the
Smartphonesource and shown in the slideshow - ❌ You can reject the photo – it will be deleted
🔄 “Refresh” Button
Lets you refresh the list of pending photos without reloading the entire configuration page.
Useful if multiple photos are sent in succession or while you're already on the page.
📨 “Telegram” Tab
The Telegram tab turns your photo frame into an interactive device, allowing you, your friends, and your family to send photos directly to the frame via the Telegram messaging app.
Here is a detailed description of each section:
1. Receiving Photos via Telegram
This section allows you to configure the basic connection between Pimmich and Telegram.
- Enable Telegram reception bot: This is the main switch. Check this box to enable all Telegram-related features.
- Telegram Bot Token: Every Telegram bot has a unique access key, called a 'token'. You need to create one by talking to the official
@BotFatherbot on Telegram, then paste the token here. - Administrator ID: This is your unique numerical ID on Telegram. It ensures that only you can administer the bot (e.g., create invitations). You can get it by talking to a bot like
@userinfobot. - "Test Bot Token" Button: Once the token is inserted, click this button to verify that Pimmich can communicate with your bot.
- Bot status: This status line tells you if the bot is currently running, stopped, or has encountered an error.
2. Managing Guest Invitations
This powerful feature allows you to authorize other people to send photos to the frame securely and temporarily.
Create a new invitation:
- Guest Name: Give the invitation a recognizable name (e.g., "Grandma", "Paul's Vacation").
- Validity Period: Choose how long the invitation code will be valid (7, 30, or 90 days).
- "Create" Button: Generates a new unique invitation in the list below.
Active Invitations List:
Each created invitation appears here with several pieces of information and actions:
- Name and expiration date.
- Status: Indicates if the invitation is "Pending", "Used" (and by whom), or "Expired".
- Invitation Link: A unique
t.me/YourBot?start=CODElink to share. The guest just has to click this link, which will open a conversation with your bot on Telegram and send the code to authorize them. - Available Actions:
- Copy Link: To share it easily.
- Revoke Access: If an invitation has been used, this button allows you to remove the guest's right to send photos.
- Delete: Permanently deletes the invitation code.
3. Telegram Source
This section is a simple reminder. For photos received via Telegram to appear in the slideshow, you must ensure that the "Telegram" source is checked in the "Photo Sources" tab.
4. Postcard Frequency (Boost)
To highlight new photos sent by your loved ones, you can temporarily increase their display frequency.
- Enable boost: Check to activate this feature.
- Boost duration (days): Define for how many days the new photos will be displayed more often.
- Boost factor: This is a multiplier. For example, a factor of
4means a new photo will be added 4 more times to the playlist, giving it 5 times more chances to appear compared to other photos.
⭐ “Favorites” Tab
This tab allows you to manage the photos you have marked as favorites so they appear more frequently in the slideshow.
❤️ Marking a Photo as a Favorite
To add a photo to your favorites, go to the “Preview” tab and click the heart icon on the desired photo's thumbnail.
🚀 Increasing Display Frequency
Photos marked as favorites are automatically added more often to the slideshow playlist.
- Boost Factor: You can set a multiplier to further increase their appearance frequency. A factor of
3means a favorite photo will have 4 times more chances to be displayed.
🗑️ Managing Favorites
The “Favorites” tab lists all the photos you have selected. Here you can:
- View all your favorites in one place.
- Remove a photo from the favorites list.
🎵 “Playlist” Tab
This tab allows you to create custom virtual albums to organize your slideshows without duplicating files.
💿 Create a Virtual Album
A virtual album is a simple list of photos you select from all your sources (Immich, USB, Samba, etc.).
- Give your playlist a name (e.g., "Vacation 2024", "Family Portraits").
- Select the photos to include from the “Preview” tab.
▶️ Play a Playlist
Once a playlist is created, you can choose to display it on the frame. The slideshow will then only show photos from that playlist.
This is a great way to theme the display for a special occasion.
🗣️ Voice Commands
Control your Pimmich frame with your voice. Once enabled, this feature allows you to manage the slideshow, sources, and more, without touching the interface.
✨ New Feature: OpenWakeWord
Following changes in Picovoice's terms, Pimmich now integrates OpenWakeWord for voice recognition. This open-source solution ensures free and privacy-respecting use.
🎙️ Activation
To activate voice recognition, simply say the wake word:
"Magic Frame"
Once the wake word is detected, the frame listens for your command for a few seconds.
📜 List of Available Commands
Here are some of the commands you can use:
Slideshow Navigation
- "Next photo" / "Previous photo": To change the image.
- "Pause" / "Resume": To pause or restart the slideshow.
Source Management
- "Enable [name] source" (e.g., "Enable Samba source").
- "Disable [name] source" (e.g., "Disable USB source").
System Control
- "Shut down frame": To properly shut down the Raspberry Pi.
- "Reboot frame": To restart the system.
🔧 “System” Tab
📶 Wi-Fi Connection Status
Displays the current network connection status in real time:
- Status: Connected / Not connected
- Network (SSID)
- Current IP address
🌐 Wi-Fi Configuration
Allows you to enter the information to connect to a network:
- Country: required to enable Wi-Fi frequencies according to regulations
- SSID: Wi-Fi network name
- Password: or leave blank for open networks
After clicking Apply Wi-Fi Settings, connection may take up to 1 minute. If it fails, check the password or restart the system.
🌐 Network Interface Management
Lets you manually enable or disable the Ethernet interface (eth0) if it interferes with Wi-Fi. Disabling Ethernet can force Wi-Fi usage only.
📡 Nearby Wi-Fi Networks
A button allows you to scan for nearby Wi-Fi networks. Clicking on a network will automatically fill in the SSID field above.
🔐 Security
You can change the password for the configuration web interface:
- New password (minimum 6 characters)
- Confirm password
💾 Backup and Restore
Allows you to:
- Back up the configuration (Immich API, filters, network, display...)
- Download the file for safekeeping
- Restore a previous configuration by uploading a file
🖥️ System Control
- 🔁 Restart the Raspberry Pi
- ⏻ Shut down the system properly
- 🔄 Restart Web Application – restarts only the web interface, without rebooting the Raspberry Pi.
📊 System Information
Displays real-time metrics:
- CPU Temperature
- CPU Usage
- RAM Usage
- Disk Space
📄 System Logs
Lets you select a log file (e.g., app.py) and:
- View recent events
- Refresh the logs
- Clear the content
Logs help diagnose errors or check service starts (slideshow, automatic imports, etc.).
🤝 Credits
- Author: Gotenash
- Contributor: Shenron
- Project created as part of Gadgetaulab
- Logo: Gadgetaulab